SyDa Generator - a tool for dataset generation
English | ČeskyTo effectively train classification algorithms, appropriate datasets and sufficient computational resources are required. When training neural networks, it's critical to possess datasets containing thousands to tens of thousands of images. This has been the driving force behind the development of software for generating datasets from 3D models. The SyDa Generator is a tool for generating images from the projection of a 3D model. This approach allows the creation of generated datasets that can be used to train machine learning algorithms and validate the results of existing solutions.
Available features
Version 1.1 (2020)
- Optional model normalization, leading to the projection having a specified width (in pixels).
- Optional addition and adjustment of point lighting.
- Support for 64k indices
- Automated reduction of the 3D model's vertex count using an external program (currently only available for Windows OS).
- Loading the model from an obj file
- Creation of annotation files for YOLO neural networks.
- Fixed bugs from the previous version
Version 1.0 (2018)
- Generating images with various rotations of a 3D model while having the option to alter the background.
- Optional scaling and rotation of the 3D model.
- Optional adjustment of the 3D model's position relative to the rotation center.
- Support for 32k indices
- Loading the model from a g3dm file.
Created as part of the project Tools and methods of video and image processing for increasing the efficiency of operations of security and rescue forces, project of the Ministry of Interior of the Czech Republic, VI20172020068, 2015-2020.
Deployment (v1.1)
The program can be run with or without parameters, which is useful when running the program via a script:
SYDAGenerator.exe config_file model_file options
Application options
-p [string] : prefix of the output files (when running in batch, we recommend changing the prefix so that the files are not overwritten),
-f          : model texture mirroring (some models have mirrored texture coordinates),
-s          : auto-generation mode,
-b [string] : path to the file containing the background,
-o [string] : output file (if it does not exist, it is created)
Example of running the generator with 3D model gun_model.obj with background forest.png. The output will be generated in the output folder and the output files will have the prefix set to test.
SYDAGenerator.exe config.json gun_model.obj -b forest.png -o output -p test
The program can be parameterized either by a configuration file (with config.json as the default configuration file) or by a user interface (some options are not available in the GUI due to the necessity of configuration loading at startup).
Contents of the configuration file (comments are for documentation purposes only and are not allowed in JSON files):
{
    "color_light" : "warm", // illumination type (warm|cool)
    "bloom" : true, // bloom effect (true|false) - This is an effect that blurs the edges, thereby visually enhancing the realism of the output.
    "bloom_fbo_scale" : 0.3, // intensity of the bloom effect (0.1-1.0)
    "yolo_annotation" : true, // to initiate the generation of YOLOv3 annotation files (true|false)
    "allow_norm_output_width_of_object" : true, // to enable object normalization based on width (see the section on Object Width Normalization). (true|false)
    "norm_output_width_of_object" : 100, // related to the preceding parameter, width in pixels.
    "target_triangles" : 10000, // the number of triangles after reduction
    "camera_fov" : 70.0, // vertical field of view of the camera
    "default_background" : "", // path to the default background file
    "rotateall" : false, // rotation in all planes (true|false)
    "euler" : "roll", // if the previous option is set to false, rotation is selected based on this parameter (roll|pitch|yaw)
    "minangle" : -45.0, // minimal abgle
    "maxangle" : 45.0, // maximal angle
    "step" : 5, // step
    "downscale" : false, // reducing the output resolution (leave it set to false).
    "light" : true, // point lighting (true|false)
    "light_roll" : -0.8, // position of the point light (-? - +?)
    "light_pitch" : 1.0, // position of the point light (-? - +?)
    "light_yaw" : -1.3000001 // position of the point light (-? - +?)
}
Loading and 3D model preparation
After selecting a 3D model file, the program will attempt to load and display the model in the scene. If the model has more vertices than the allowed limit, the program will launch an external tool to perform reduction. The reduced model will be saved in the same folder as the original file. The name of the reduced file is generated using the original name and a hash calculated from the name and path of the original file. SYDAGenerator will then load the reduced model.
Upon loading, the model will be in its original scale as determined by its storage. In most cases, you will need to modify the model by resizing, properly orienting it, and finally centering it. Keep in mind that during generation, the model rotates with respect to the origin of the coordinate system (this point is represented in the program by the intersection of three planes).
You can modify the model using the following keyboard shortcuts:
R + (left arrow|right arrow) - rotation around the Z-axis
T + (left arrow|right arrow) - rotation around the Y-axis
Y + (left arrow|right arrow) - rotation around the X-axis
X + (left arrow|right arrow) - rotation around the Z-axis
C + (left arrow|right arrow) - rotation around the Y-axis
V + (left arrow|right arrow) - rotation around the X-axis
F + (left arrow|right arrow) - scale change
After making the modifications, save the model configuration either by using the Save Options option in the user interface or by using the shortcut CTRL + S.
Normalization of the object by width
In some situations, it is appropriate to have the size of objects standardized to a specific width. The program allows you to normalize the output to a desired width (in pixels). In the configuration file, the option allow_norm_output_width_of_object must be set to true. Normalization is done relative to the distance determined by points marked on the image. These are the points created by the intersection of the 3D model, the red plane, and the blue plane.
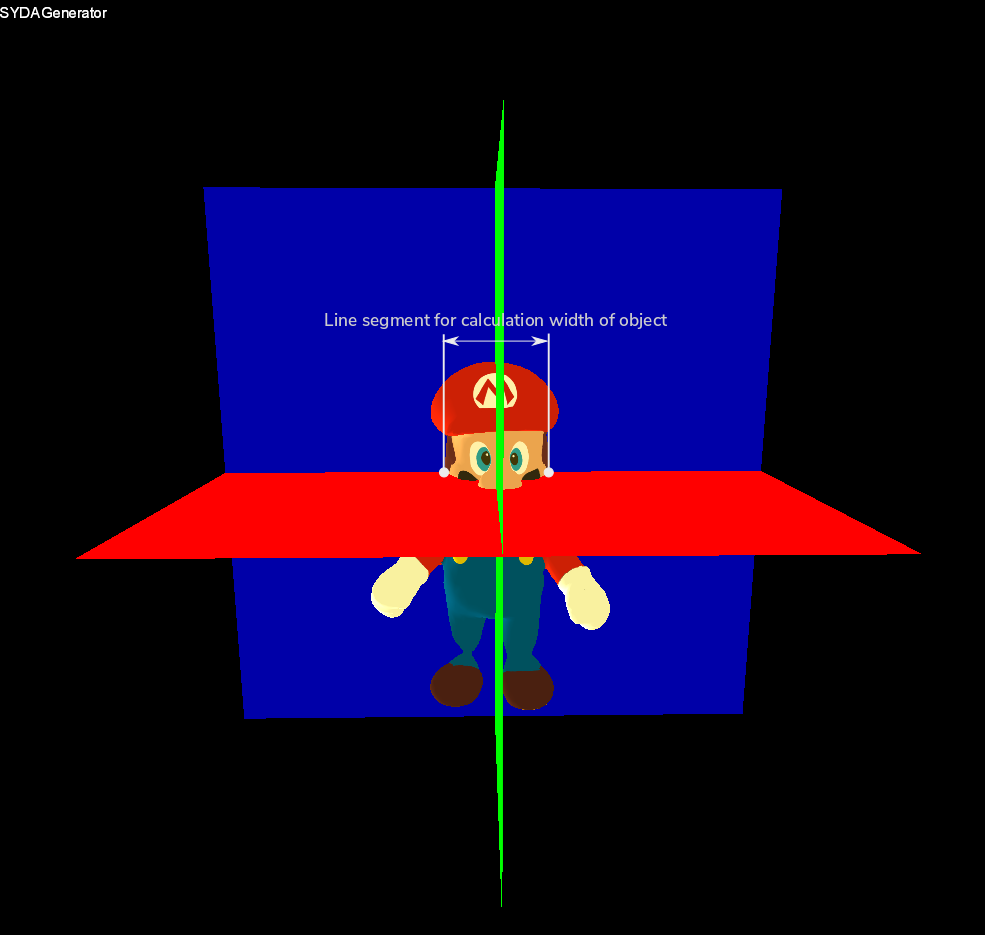
After projection, this distance on the output frames will have the desired width (the norm_output_width_of_object parameter value).
Setting scene parameters
Among the main scene parameters are the vertical field of view of the camera (VFOV) and the distance from the camera to the object (Distance to object). Other options can be managed using the following keyboard shortcuts.
1 - Toggle display of coordinate system planes (recommended for centering adjustments).
2 - Toggle background on/off.
G - Start/stop generating frames at angles.
Setting up point lighting
If you want to illuminate the object with point lighting, you can set the lighting position using Euler angles in the configuration file or through the UI.
Generation
The process of generating frames is initiated by pressing the G button or by clicking on Dataset -> Start generating.
Generation is configured using the following items in the configuration file.
{
    "rotateall": false, // rotation in all planes (true|false)
    "euler": "roll", // if the previous option is false, rotation is selected based on this parameter (roll|pitch|yaw)
    "minangle": -45.0, // minimum angle
    "maxangle": 46.0, // maximum angle
    "step": 5 // step
}
If you enable the rotateall option (by setting it to true), the rotation will occur in the yaw, pitch, and roll angles within the specified range of minangle to maxangle. However, if you set the rotateall option to false, the model will rotate only along the axis specified by the euler parameter.
Tips for working with the program
If you have multiple models that are the same or very similar, you can use one model configuration file (not the program's config.json) for the others by renaming it to match the name of the other models with a 2 suffix. For example, if you have model1.obj that you modify in the program and save its configuration (CTRL+S), the configuration will be saved in a file named model1.obj.json (in the same directory as the 3D model file). If you want to use the same configuration for model2.obj, simply copy the file (model1.obj.json) to the directory where model2.obj is located and rename it to model2.obj.json.
If the program reduces the 3D model, it will create a file with a name composed of a hash and the original file name. When you open the model file again, it will load the previously saved reduced model. However, a potential issue may arise if you modify the original file (without changing its path), and the program continues to load the reduced model. Therefore, after modifying your model, you may need to delete the file with the modified model's name (e.g., nazev_modelu_xxxxxxxxxxxxxxxxxxxxxxxxxxxxxxxx.obj).
Modules for post-processing generated frames
These modules are used to simulate various characteristics of real cameras, such as resolution, distortion, and noise. In the basic version of the program, these modules are disabled. To activate and obtain these modules, a commercial license is required. For more information, you can contact the email address igoldmann@fit.vutbr.cz.
Samples of output
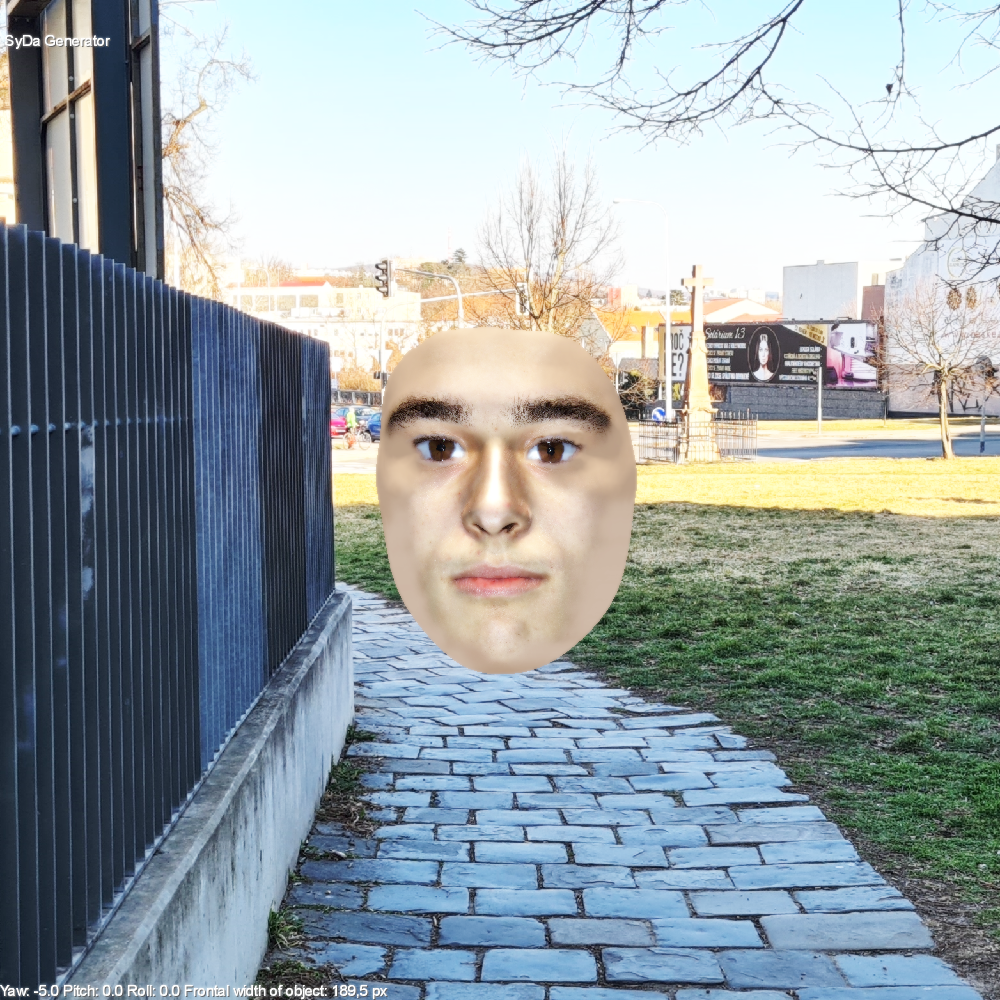
Projection of a generated 3D head model.
To download
64-bit version for Windows: here
About the program
Author: Tomas Goldmann igoldmann@fit.vutbr.cz
Research group STRaDe website: https://strade.fit.vutbr.cz/en/
If you use this application, please cite the following publication.title = "Generating Face Image Dataset Using a 3D Head Model",
pages = "1--4",
booktitle = "2021 International Conference on Computer, Communication, Chemical, Materials and Electronic Engineering (IC4ME2)",
year = 2021,
location = "Rajshahi, BD",
publisher = "Institute of Electrical and Electronics Engineers",
ISBN = "978-1-6654-0638-3",
doi = "10.1109/IC4ME253898.2021.9768496",
language = "english",
url = "https://www.fit.vut.cz/research/publication/12622" }
License: Creative Commons BY-NC-SA 3.0
Because the license for using this software is free, no warranties are provided. Copyright holders and/or other parties provide this software "as is," without any warranties of any kind, including, but not limited to, the implied warranties of merchantability and fitness for a particular purpose. You assume all risks concerning the quality or performance of this software. If it is found to be defective, you assume the cost of all necessary servicing, repair, or correction.